协同编辑一直是一个技术上具有挑战性的领域,其中数据一致性问题尤为复杂,但随着各种技术迭代,目前已经有了比较成熟的解决方案,下面会介绍介绍 CRDT 以及其开源方案 Yjs 的协同方案,并通过demo 来更好的了解如何快速的构建一个多人协同编辑器
数据一致性问题
协同编辑最大的问题就是在实时同步的过程中,确保多个用户同时编辑同一文档时,所有用户的编辑行为能够互相同步,最终产出文档的状态符合所有用户预期的条件。
通常产品的解决方案有以下三种:
CRDT (Conflict-free Replicated Data Type)
前面提到,OT 依赖中心化服务器完成协作,在网络传输和分布式系统中,数据到达服务器的时间不用,最终得到的结果也可能不同。可以在 OT 可视化 网站中试一下:
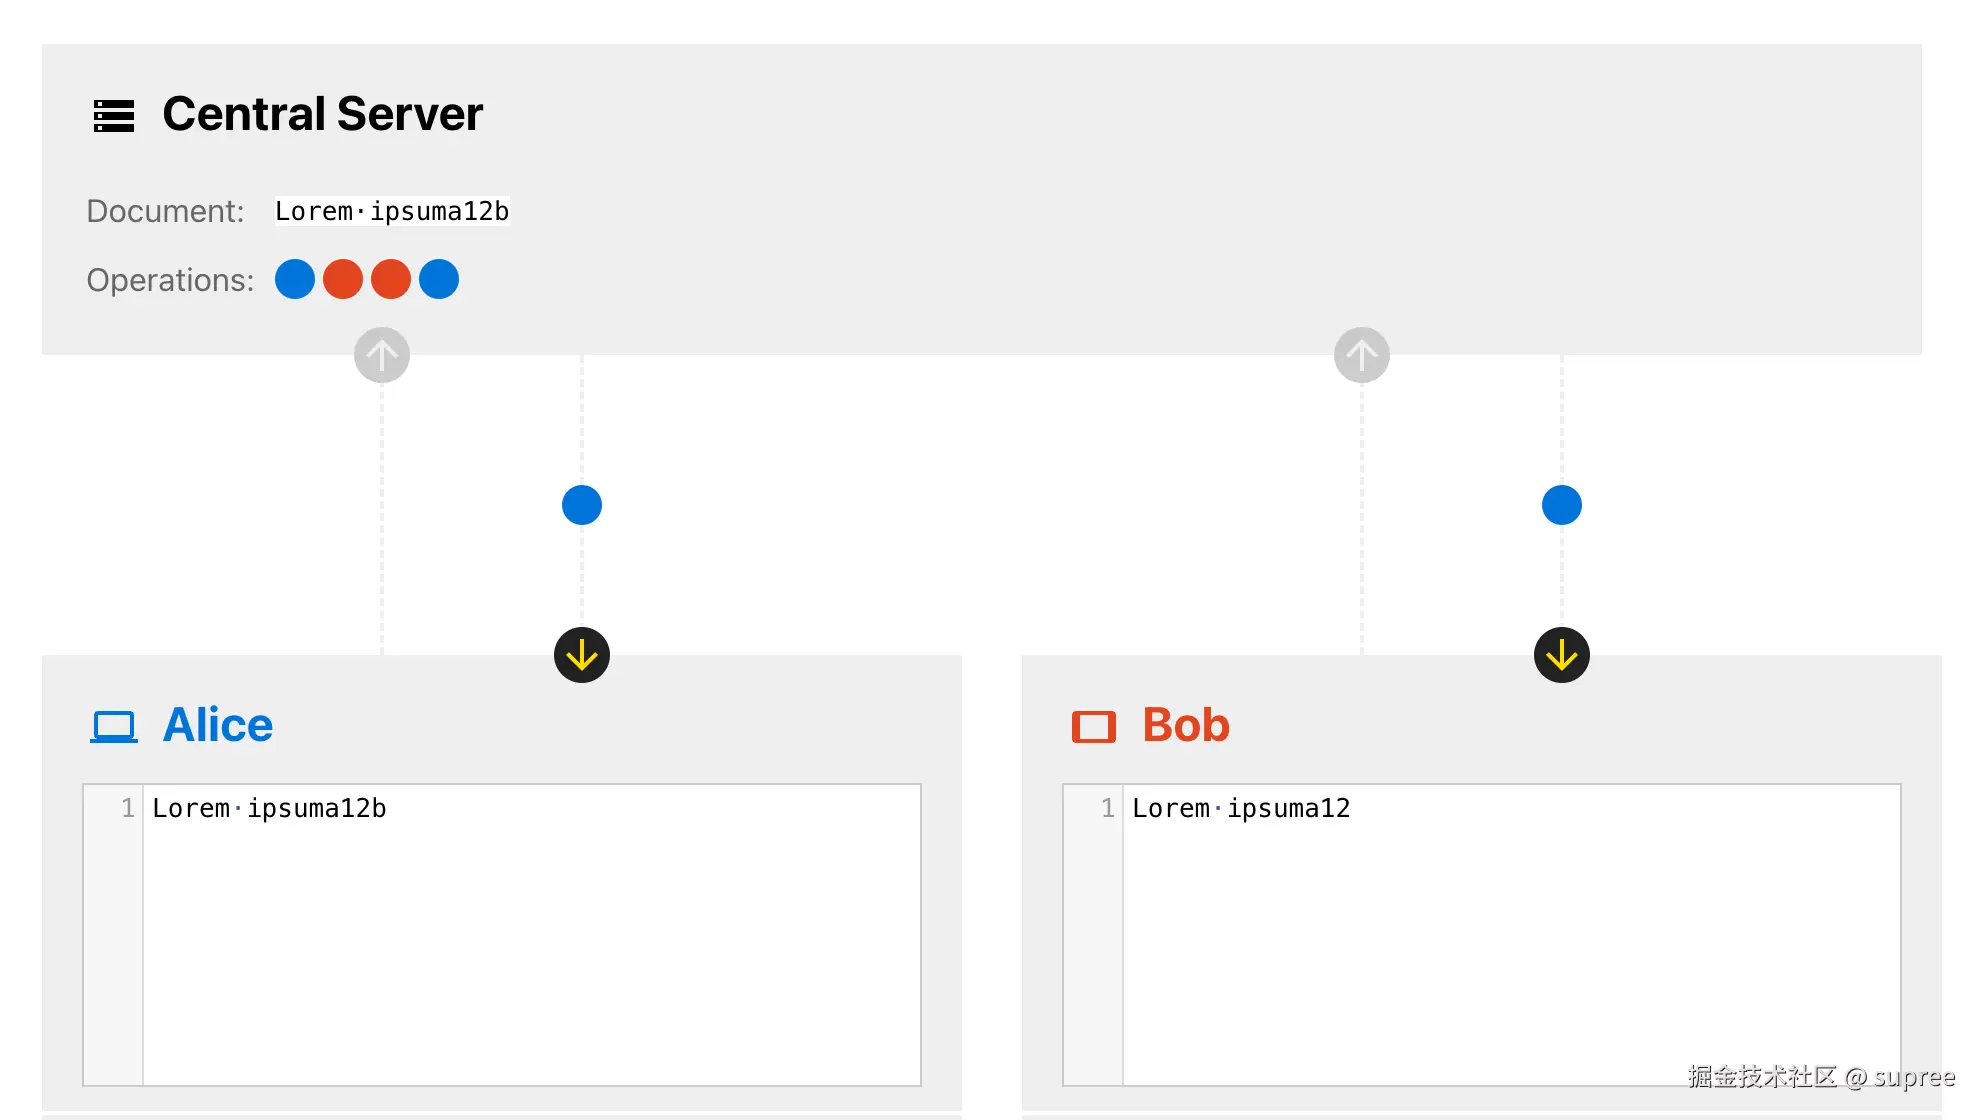
Alice 在末尾插入了 ab,并且 操作a 已经到达了服务器,而 操作b 由于网络延迟还没送达,而后 Bob 在末尾插入了 12,并且,操作1 和 操作 2 都在 操作a 之后到达服务器:
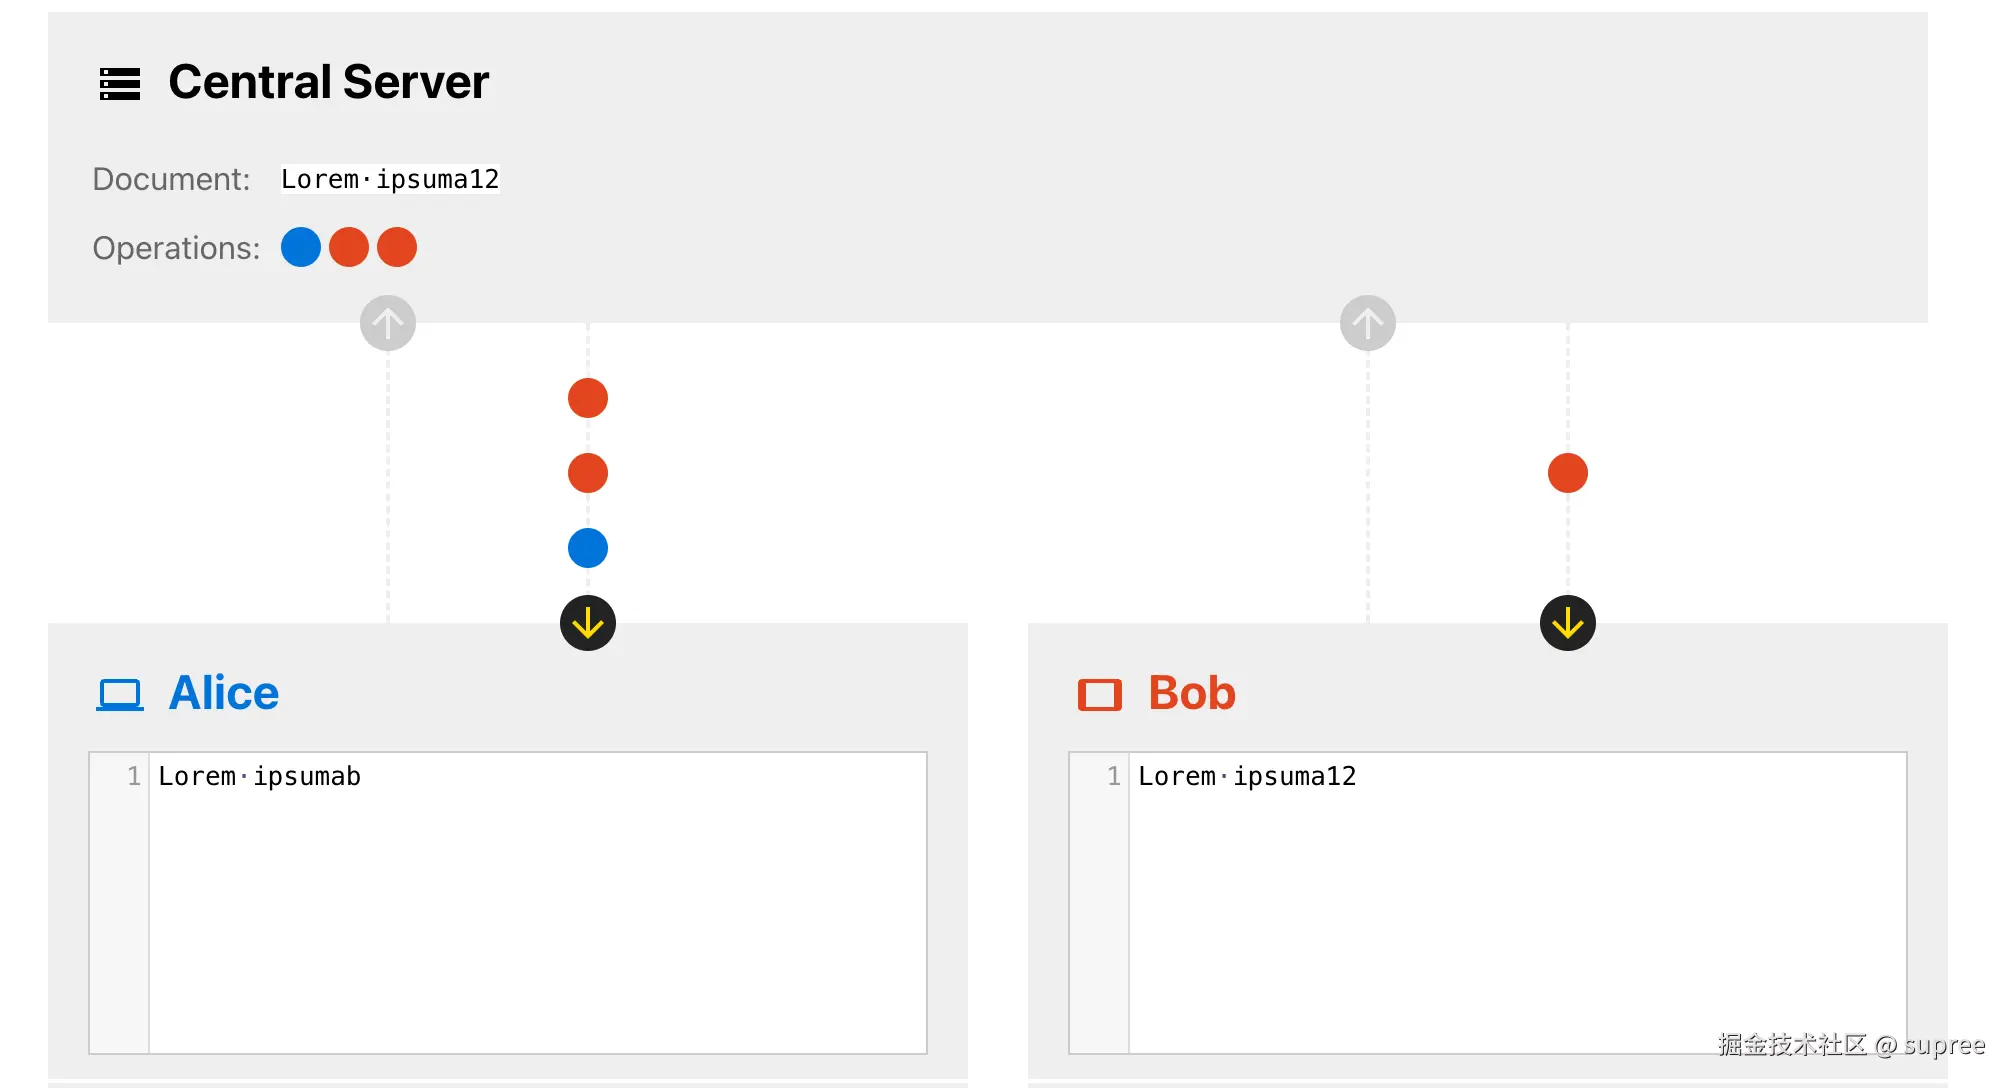
随后操作 操作b 到达服务器,结果则变成了 Lorem·ipsuma12b 而不是预期的 Lorem·ipsumab12
而 CRDT 的提出则是为了解决数据这种最终一致性的问题,根据CAP 定理,对于一个分布式计算系统来说,不可能同时完美地满足以下三点:
因此系统如果不能在时限内达成数据一致性,就意味着发生了分区的情况,必须就当前操作在 C 和 A 之间做出选择,所以「完美的一致性」与「完美的可用性」是冲突的。
CRDT 不提供「完美的一致性」,而是保证了「最终一致性」。意思是进程 A 可能无法立即反映进程 B 上发生的状态改动,但是当 A B 同步消息之后它们二者就可以恢复一致性,并且不需要解决潜在冲突(CRDT 在数学上就不让冲突发生)。而「强最终一致性」是不与「可用性」和「分区容错性」冲突的,所以 CRDT 同时提供了这三者,提供了很好的 CAP 上的权衡。

CRDT 的基本原理
CRDT 有两种类型:Op-based CRDT(操作一致性) 和 State-based CRDT(状态一致性):
基于状态的 CRDT 更容易设计和实现,每个 CRDT 的整个状态最终都必须传输给其他每个副本,每个副本之间通过同步全量状态达到最终一致状态,这可能开销很大;
而基于操作的 CRDT 只传输更新操作,各副本之间通过同步操作来达到最终一致状态,通常很小。
CRDT 的优势
去中心化减少对服务器的依赖,任意客户端可自行独立地解决冲突。
性能通过近些年的优化,CRDT 的性能已经超越传统 OT 的性能,并且由于 CRDT 的去中心化性质,可以容忍较高的延迟,并且可在离线模式下解决冲突。
灵活性和可用性CRDT 支持更广泛的数据类型,像 Yjs 支持 Text、Array、Map 和 Xml 等数据结构,使其适用于更多业务场景。
Yjs 介绍Yjs 基本概念
/yjs/yjs
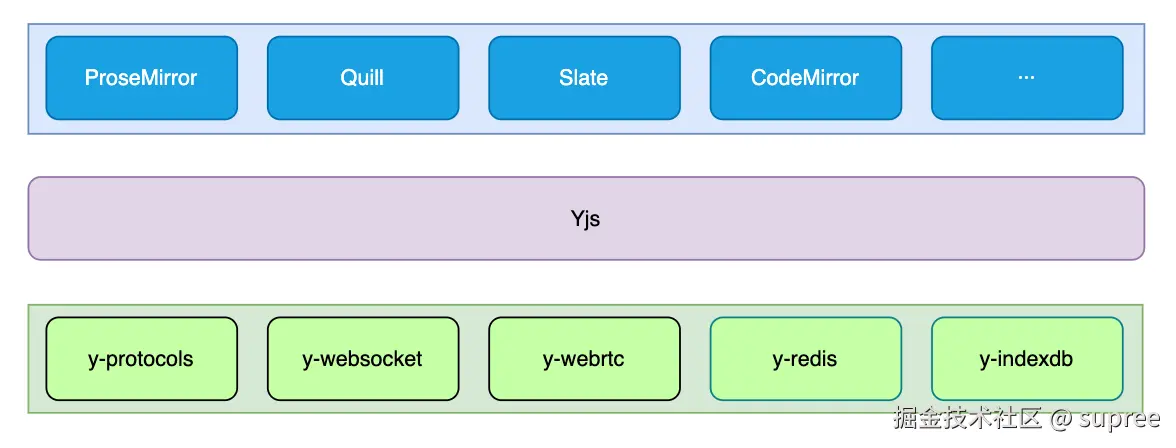
在 Yjs 的介绍中说明中提到,Yjs 是,它公开了其内部的 data 结构作为 共享类型。并且其与网络无关,支持许多现有的富文本编辑器、离线编辑、版本快照、撤消/重做和意识感知。
Yjs 架构图
Quill + Yjs 协同编辑
下面我们根据官网的例子来实现一个简单的 demo,会发现现有的方案已经能帮我们快速完成一个简单能用的方案,这里用 Quill 来作为演示。
初始化 web 端
首先创建一个 vue 项目,并且安装相关依赖
pnpm create vite co_editor --template vue
pnpm add quill quill-cursors yjs y-quill y-websocket
依赖说明:
首先封装一下 quill 初始化的函数
// src/common/utils/QuillEditor.js
import Quill from 'quill';
import QuillCursors from 'quill-cursors';
import 'quill/dist/quill.snow.css';
Quill.register('modules/cursors', QuillCursors);
export class QuillEditor {
  constructor(editorContainer) {
    this.quillInstance = new Quill(editorContainer, {
      theme: 'snow',
      modules: {
        cursors: true
      }
    });
  }
  getInstance() {
    return this.quillInstance;
  }
}
接下来封装一下协同操作需要的工具,这样后续针对协同的操作都可以在这里处理
// src/collaboration/collaborationService.js
import { QuillBinding } from 'y-quill';
import { WebsocketProvider } from 'y-websocket';
import * as Y from 'yjs';
export class CollaborationService {
  constructor(wsUrl) {
    this.wsUrl = wsUrl;
  }
  setupCollaboration(docId, quill) {
    const ydoc = new Y.Doc();
    const provider = new WebsocketProvider(this.wsUrl, docId, ydoc);
    const ytext = ydoc.getText('quill');
    new QuillBinding(ytext, quill, provider.awareness);
    provider.on('status', event => {
      console.log(event.status);
    });
    return { ydoc, provider };
  }
}
在 App.vue 中使用
template>
  div id="app">
    div ref="editorContainer" class="quill-editor">div>
  div>
template>
script>
import { onMounted, ref } from 'vue';
import { CollaborationService } from './collaboration/collaborationService';
import { QuillEditor } from './common/utils/QuillEditor';
const wsUrl = 'ws://127.0.0.1:1234';
const docId = 'my-shared-document';
export default {
  name: 'App',
  setup() {
    const editorContainer = ref(null);
    onMounted(() => {
      const quillEditor = new QuillEditor(editorContainer.value);
      const collaborationService = new CollaborationService(wsUrl);
      collaborationService.setupCollaboration(docId, quillEditor.getInstance());
    });
    return {
      editorContainer
    };
  }
};
script>
style scoped>
#app {
  max-width: 800px;
  margin: 50px auto;
}
.quill-editor {
  height: 400px;
}
style>
搭建协同网络服务
take server
pnpm init
pnpm add ws y-websocket
touch app.js
接着添加服务器的代码
// server/app.js
const WebSocket = require('ws');
const { setupWSConnection } = require('y-websocket/bin/utils');
const port = 1234;
const wss = new WebSocket.WebSocketServer({ port });
wss.on('connection', (ws, req) => {
  const docName = req.url.slice(1);
  console.log("等待初始化 WS 服务...", docName);
  setupWSConnection(ws, req, { docName })
});
然后再 server/package.json 添加命令 “start”: “node app.js”, 并且运行,然后就能得到一个支持离线编辑,光标状态同步的协同文档了。
到这里就完成一个协同文档,得益于 Yjs 提供了针对 Quill 等富文本编辑器的一些配套,所以写一些接入层的代码即可实现一个协同文档,但 Yjs 本身是框架无关的,Yjs 本身是一个数据结构,对于文档内容修改,通过中间层将文档数据转换成 CRDT 数据;通过 CRDT 进行数据数据更新这种增量的同步,通过中间层将 CRDT 的数据转换成文档数据,另一个协作方就能看到对方内容的更新。对于中间内容的更新以及冲突处理,都是 Yjs 承担的,所以 Yjs 可以支持任意需要协同的场景,比如像 Figma、在线思维导图, 下面我们直接基于 Yjs 来实现中间层的代码,以便更好的理解 Yjs 的能力
实现文档编辑同步
上面将文档内容的修改转成 Yjs 的 CRDT 数据是使用了 y-quill 这个库,我们首先实现这个能力,我们把 QuillBinding 的代码去掉,然后通过 Quill 提供的 API 来处理文档内容的变更,代码入下,在 bindYjsToQuill 中:
// src/collaboration/collaborationService.js
import { WebsocketProvider } from 'y-websocket';
import * as Y from 'yjs';
export class CollaborationService {
constructor(wsUrl) {
this.wsUrl = wsUrl;
}
setupCollaboration(docId, quill) {
const ydoc = new Y.Doc();
const provider = new WebsocketProvider(this.wsUrl, docId, ydoc);
const ytext = ydoc.getText('quill');
// new QuillBinding(ytext, quill, provider.awareness);
// 初始化 Quill 内容
quill.setContents(quill.clipboard.convert(ytext.toString()));
this.bindYjsToQuill(ydoc, ytext, quill);
provider.on('status', event => {
console.log(event.status);
});
return { ydoc, provider };
}
bindYjsToQuill(ydoc, ytext, quill) {
quill.on('text-change', (delta, oldDelta, source, origin) => {
if (source === Quill.sources.USER) {
ydoc.transact(() => {
ytext.applyDelta(delta.ops);
}, ytext);
}
});
ytext.observe((event, transact) => {
if (transact.origin!== ytext) {
quill.updateContents(event.delta, 'yjs');
}
});
}
}
来看看,现在已经支持了文本的同步
实现光标状态同步
光标(意识)同步,上面也是在 y-quill 中实现的,在下面的 setupCursors 方法中:
// src/collaboration/collaborationService.js
import Quill from 'quill';
import { WebsocketProvider } from 'y-websocket';
import * as Y from 'yjs';
const updateCursor = (quillCursors, aw, clientId, doc) => {
  try {
	// 这里要区分是远端同步,还是当前编辑器的光标
    if (aw && aw.cursor && clientId !== doc.clientID) {
      const user = aw.user || {};
      const color = user.color || '#fc4';
      const name = user.name || `User: ${clientId}`;
      quillCursors.createCursor(clientId.toString(), name, color);
      if (aw.cursor) {
        quillCursors.moveCursor(clientId.toString(), aw.cursor);
      }
    } else {
      quillCursors.removeCursor(clientId.toString())
    }
  } catch (error) {
    console.log(error);
  }
}
export class CollaborationService {
  constructor(wsUrl) {
    this.wsUrl = wsUrl;
  }
  setupCollaboration(docId, quill) {
    const ydoc = new Y.Doc();
    const provider = new WebsocketProvider(this.wsUrl, docId, ydoc);
    const ytext = ydoc.getText('quill');
    // new QuillBinding(ytext, quill, provider.awareness);
    // 初始化 Quill 内容
    quill.setContents(quill.clipboard.convert(ytext.toString()));
    this.bindYjsToQuill(ydoc, ytext, quill);
    // 共享光标位置和状态信息
    this.setupCursors(provider, ytext, quill);
    provider.on('status', event => {
      console.log(event.status);
    });
    return { ydoc, provider };
  }
  bindYjsToQuill(ydoc, ytext, quill) {
    // ...
  }
  setupCursors(provider, ytext, quill) {
    const awareness = provider.awareness;
    const cursorsModule = quill.getModule('cursors');
     // 更新本地光标状态
     quill.on('selection-change', (range, oldRange, source) => {
      if (source === Quill.sources.USER) {
        if (range) {
          awareness.setLocalStateField('cursor', {
            index: range.index,
            length: range.length
          });
        } else {
          awareness.getLocalState() !== null &&
          awareness.setLocalStateField('cursor', null);
        }
      }
    });
    // 监听远程光标状态变化
    awareness.on('change', changes => {
      changes.added.forEach(clientId => {
        const state = awareness.getStates().get(clientId);
        updateCursor(cursorsModule, state, clientId, ytext.doc);
      });
      changes.updated.forEach(clientId => {
        const state = awareness.getStates().get(clientId);
        updateCursor(cursorsModule, state, clientId, ytext.doc);
      });
      changes.removed.forEach(clientId => {
        cursorsModule.removeCursor(clientId);
      });
    });
  }
}
到这里已经实现了光标的状态同步了,但仔细观察会发现多个光标的颜色的一样的,因为颜色使我们默认设置的,要随机颜色也很简单,代码如下:
import Quill from 'quill';
import { WebsocketProvider } from 'y-websocket';
import * as Y from 'yjs';
const updateCursor = (quillCursors, aw, clientId, doc) => {
  // ...
}
export class CollaborationService {
  constructor(wsUrl) {
    this.wsUrl = wsUrl;
  }
  setupCollaboration(docId, quill) {
    const ydoc = new Y.Doc();
    const provider = new WebsocketProvider(this.wsUrl, docId, ydoc);
    const ytext = ydoc.getText('quill');
    // new QuillBinding(ytext, quill, provider.awareness);
    // 初始化 Quill 内容
    quill.setContents(quill.clipboard.convert(ytext.toString()));
    this.bindYjsToQuill(ydoc, ytext, quill);
    // 自定义光标颜色
    this.updateAwareness(provider.awareness, ydoc.clientID);
    // 共享光标位置和状态信息
    this.setupCursors(provider, ytext, quill);
    provider.on('status', event => {
      console.log(event.status);
    });
    return { ydoc, provider };
  }
  bindYjsToQuill(ydoc, ytext, quill) {
    // ...
  }
  updateAwareness (awareness, userId) {
    const user = {
      name: `User ${userId}`,
      color: `#${Math.floor(Math.random() * 0xffffff).toString(16)}`,
    };
    awareness.setLocalStateField('user', user);
  }
  setupCursors(provider, ytext, quill) {
    // ...
  }
}
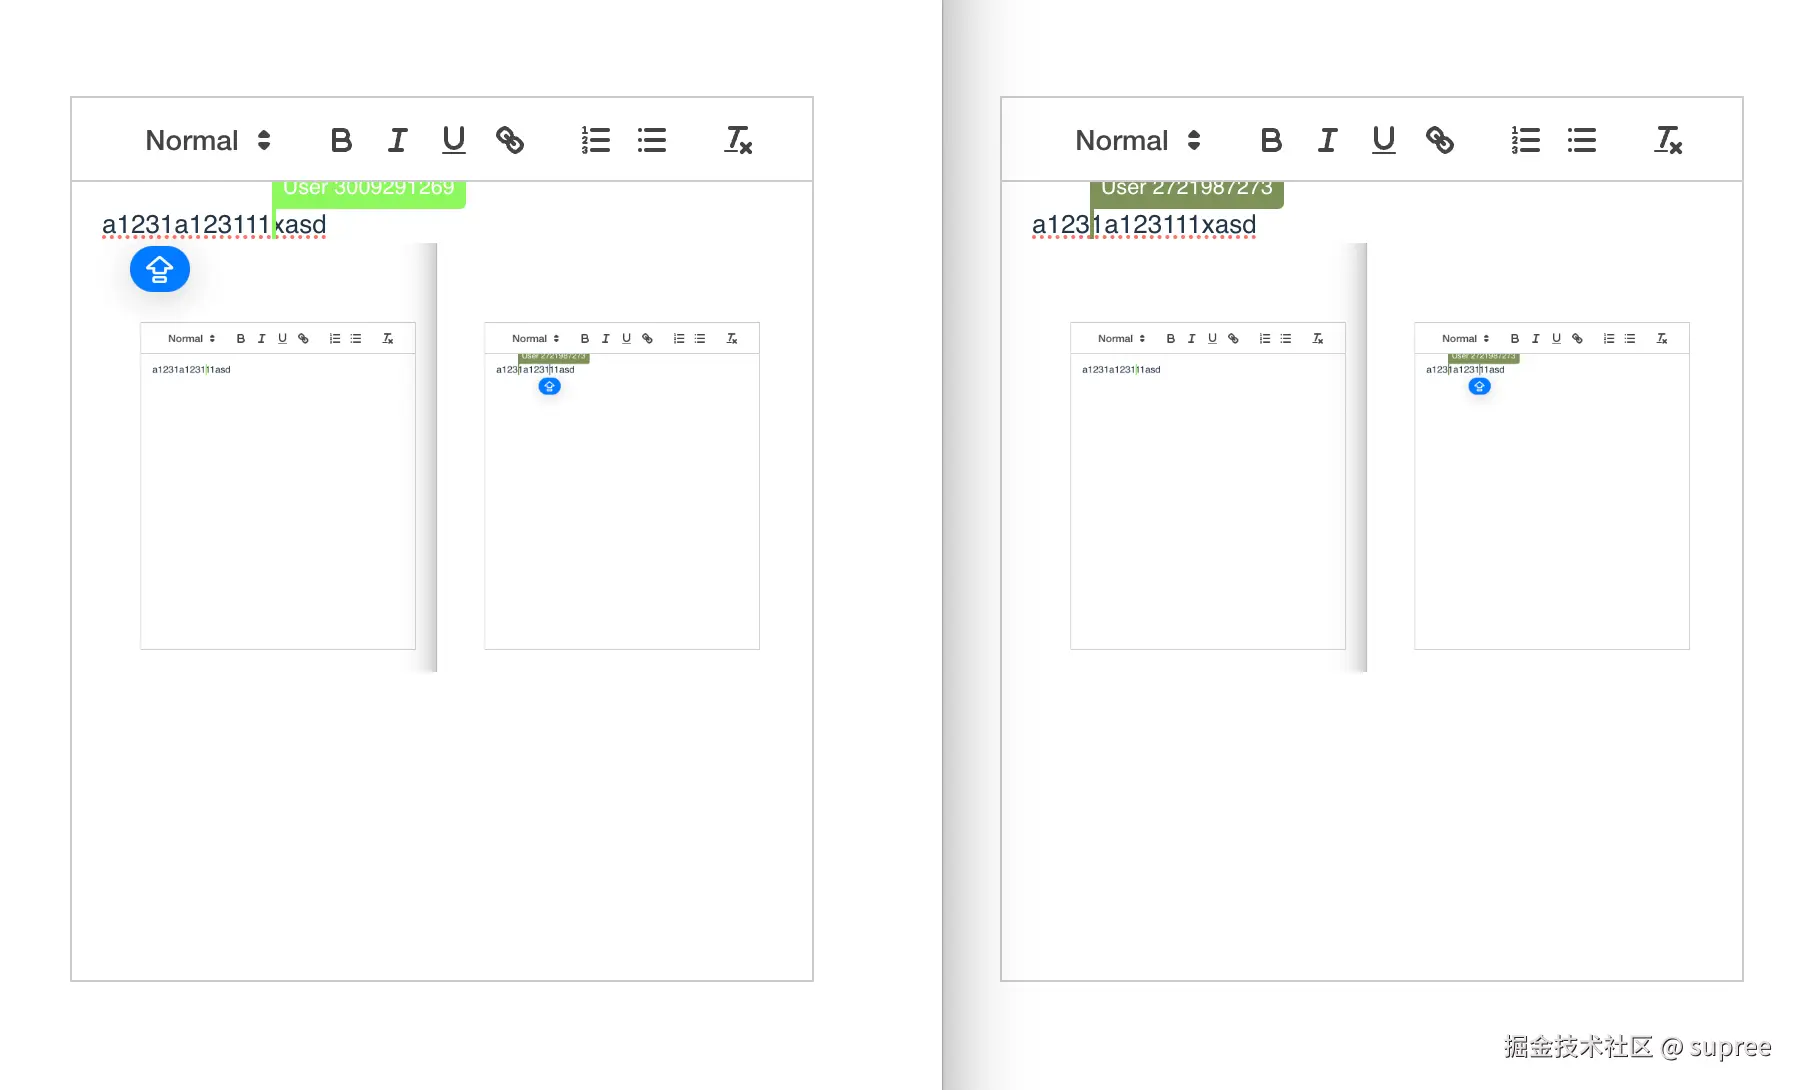
总结
这篇文章简单的介绍了 CRDT 协同算法的一些概念,然后介绍了其开源的视线方案 Yjs,Yjs 通过合理的数据结构,来规避了复杂的数据冲突处理,是一套不同于 OT 的数据一致性解决方案。
后半部分通过 Yjs 实现了一个 demo,以及部分中间层的代码开发,来了解通过 Yjs 开发一个协同文档需要做什么,由于 Yjs 可以自动处理冲突,因此可以更容易的开发不同协同工具,比如富文本编辑器,思维导图,文档等。
由于时间关系,文章并不涉及其中的一些实现原理,我也还在学习中,文章内容如有疏漏或错误,望不吝赐教!
